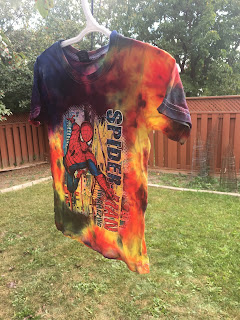
As many of you may know that I come from Gujarat and one of the many things it is
famous for is “Bandhani” which is a kind of tie-dye textile. I have loved the bandhani
since forever. I never knew that one of its version could be done at home until
last summer when we went on a camping trip which was very child friendly and
had a lot of child-centric activities. One of the activities was tie-dye and I
loved it more than Angel. And recently, I did it at home along with Angel. So I got a tie dye kit and a
couple of white t-shirts for her as well as for myself. We had a blast and the
results are gorgeous. We are already longing to do more tie-dye projects!
So the
kit I got had basically all the materials that we needed. It has the dye
bottles with powdered dye, some elastic bands and disposable gloves.
We had
to fill the bottle with water and shake it up so that it mixes properly and
gives an even color.
The
wired rack with a tray underneath made it easier for us to work.
We
soaked our t-shirts in water for around 15-20 minutes before we started. We
made a couple of patters and even matched 2 as Angel wanted J
We were
having so much fun with the project that I forgot to click step wise pics,
however they are fairly simple and easily available online.
Pattern
# 1 – Stripes
1. Pleat and fold fabric vertically
2. Use elastic bands to secure the
fabric and make as many sections as you wish
3. Apply dye to each section. Flip
it and repeat on the other side. We alternated between blue and red, you can
use as many colors or any pattern that you wish!
Pattern
# 2 – Swirl
1. Pinch the t-shirt at the center
and twist it until it gets spiral shape
2. Bind 3-4 elastic bands
overlapping each other, to create 6-8 wedges
3. Apply the dye to each section
making a pattern if you desire. Flip it and repeat on the other side
We matched :)
Pattern
# 3 – Bull’s Eye
1. Pinch the t-shirt at the center
and pull it upwards in a conical shape
2. Tie the first elastic 2 inches
below the center and then continue to tie as many as you wish in a downward
direction. We used 2
3. Dye each section in the desired
color
Pattern
# 4 – Sunburst
1. Pinch the t-shirt and pull it
upwards about 1-2 inches to tie the elastic.
2. Create as many sunbursts as you
want
3. Apply dye to tips and apply
another color to the rest of the t-shirt. I used my grey t-shirt so I just
mixed all the colors on the tips
Pattern
# 5 – Crumpled
1. Crumple the t-shirt
2. Randomly secure it with elastic
bands
3. Dye it. We had a lot of yellow
left so we did it just with yellow. You can use your creativity and use
multiple shades if you want!
Pattern
# 6 – Random
This is
just that – random. So we had some dye left and I handed Angel a t-shits which
had a white background to tie dye as she pleased. She was thrilled. She randomly
tied the elastic bands wherever she wished and randomly used the color
whichever she liked. She had the most fun doing this and the result is still
beautiful!


5 comments:
How cool is this... :) I loved all the designs... specially the yellow one.. (as it is my favorite color... :) )
Thanks Reema! It sure is a lot of fun and its addictive, you cant just stop at 1 :)
~Sneha
Awesome job! Loved all the different patterns ��
Thanks Manali :) We had a lot of fun doing this!
~Sneha
thank you for sharing
viagra jakarta
viagra usa
viagra asli
obat viagra
jual viagra
viagra asli jakarta
obat viagra jakarta
viagra original jakarta
toko viagra jakarta
Post a Comment